Lexicon: Archive & Watch folder
Hi everyone,
Today I'm going to show you three Lexicon features that will make your library management life much easier: The Watch Folder, the Incoming Tracks and the Archive.
With these powerful tools in your arsenal, you will be able to keep your music library under control much easier and faster.
Previous Lexicon posts:
Watch Folder
You can tell Lexicon to watch a folder of your choice and any track you add there will automatically be imported into Lexicon. These tracks will be marked as incoming (more on that below). Setting your Downloads folder as watch folder would be perfect for this.
That's the first part of the watch folder, the real power comes after that.
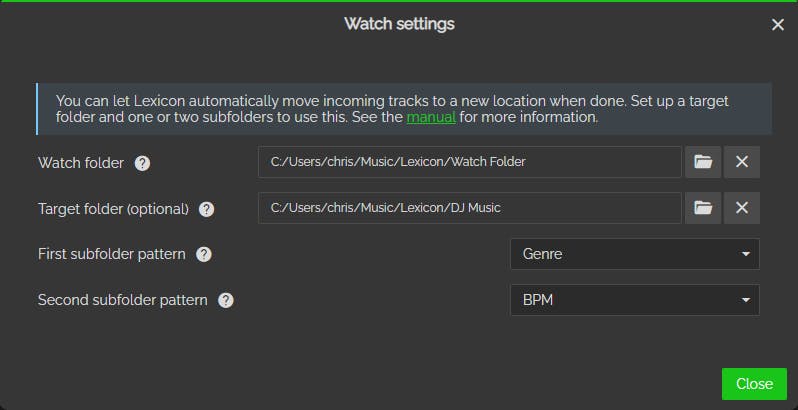
You can also set up a Target Folder in Lexicon. Once you set up the target folder, Lexicon will automatically move any track from the watch into your target folder. What that means is that you can just download/drop any music file in your watch folder and Lexicon moves it to your target folder, which could be your DJ music folder. You don't need to do that step manually anymore.
And to improve that idea even more, you can also set up two Subfolders based on fields. For example, you can set the first subfolder to the Genre field and the second to the BPM field. Now Lexicon will automatically move your music to your DJ music folder with extra subfolders.

For example; a drum & bass track with BPM of 175 would get moved to something like `Music/Drum & Bass/175/my track.mp3`. Now you can keep your hard drive clean automatically! This works with any field like Artist, Album or more. Whatever your folder structure is, Lexicon can help you there!

Incoming Tracks
When Lexicon adds tracks automatically through the watch folder (or through other automatic means), these tracks will be marked as incoming. Incoming tracks are visible on the special incoming page. This page is just a normal track browser that only shows incoming tracks. The useful part here is that generally incoming tracks need to be checked or cue point need to be added, etc. Now you can do that on the incoming page and once you've done all that you can mark these tracks as done and they are removed from the incoming page.
So you can basically see the incoming page as a track "todo" list. If you do all your preparation work on the incoming page then you can keep a perfectly tidy library!
Archive
The last super useful feature is the Archive. The archive is perfect for music hoarders who let their library grow out of control.
The archive is pretty simple but gives you more control over your old or low quality tracks. How it works is that you can archive any track and those archived tracks will no longer appear in your track browser or in any of the Lexicon features. They will still appear in your playlists so archiving tracks won't affect them.
All your archived tracks are visible on the special Archive page. This page only displays archived tracks and this is where you can also unarchive them so they will re-appear in your track browser.
The archive page has a few helper tools that can really speed up deciding which tracks you want to get rid of permanently. With the Selection Helper you can select tracks that have been in the archive for any amount of times. For example, this way you could delete tracks that have been in your archive for longer than a month. If you haven't missed them for that long, maybe they aren't worth keeping around!
You can also select tracks that have no cue point or don't appear in any playlist this way. These were probably not very important so you can clean them.
Cleaning tracks from the archive gives you two options: a) delete from Lexicon or b) delete from Lexicon AND your computer. This will win you back a lot of space on your computer.

More soon
I hope you enjoyed the quick look at these powerful library tools.
There will be another blog article soon, stay tuned!